NodeMCU is very popular in Home Automation. It’s WiFi capabilities and Arduino IDE support making it easier for IoT Applications. It is very tiny and has many Digital I/O pins, Serial Communication and I2C Communication. NodeMCU has a micro USB port to program it using your existing mobile cable (no additional programmer needed). There is a successor called ESP32 Development board which has more Analog pins and Digital pins. You can use any one of them for this project according to your requirements. Here we will be using NodeMCU.
Blynk is a mobile application which has its own server to process user requests. It is an open source application and anybody can use it in their Home Automation to control devices, monitor sensor data and get a notification by some trigger actions. It has a nice GUI with Graphs, Timers, Slider, Joystick and even Video Streaming. You can also make your own app and publish it in Google play store.
Components required:
Hardware:
NodeMCU Development board – Buy Now
4 Channel Relay – Buy Now
USB cable
Software required:
Blynk App
Arduino IDE
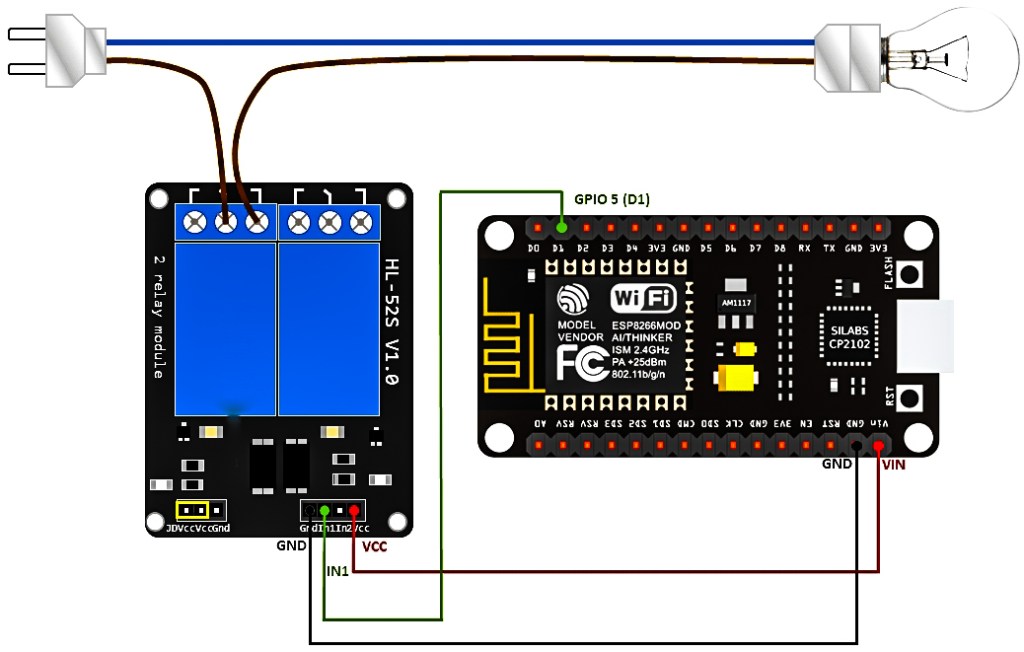
Circuit Diagram:
Products buying details ;
*NodeMCU : https://www.amazon.in/dp/B08KGKNJSM/ref=cm_sw_r_cp_apa_glc_fabc_D60ECN1J246NQBM5AJS3
°
°
*Single channel relay module :
https://www.amazon.in/dp/B08242LQ68/ref=cm_sw_r_cp_apa_glc_fabc_ZHP2PAVK2HM4CEAJVK6J
°
°
*4 channel relay module :
https://www.amazon.in/dp/B072J3QT1J/ref=cm_sw_r_cp_apa_glc_fabc_2J14ZGNG7HA62V9D8M4H
°
°
Female to female jumber wire :
https://www.amazon.in/dp/B00ZYFX6A2/ref=cm_sw_r_cp_apa_glc_fabc_6G6FGKW9FH5V7PYE5MZH
°
°
°
*You can buy these all product at low cost from
Vyga : http://www.vyga.in/
Instagram.com/mr_jpg_exporter
/*************************************************************
Download latest Blynk library here:
https://github.com/blynkkk/blynk-library/releases/latest
Blynk is a platform with iOS and Android apps to control
Arduino, Raspberry Pi and the likes over the Internet.
You can easily build graphic interfaces for all your
projects by simply dragging and dropping widgets.
Downloads, docs, tutorials: http://www.blynk.cc
Sketch generator: http://examples.blynk.cc
Blynk community: http://community.blynk.cc
Follow us: http://www.fb.com/blynkapp
http://twitter.com/blynk_app
Blynk library is licensed under MIT license
This example code is in public domain.
*************************************************************
This example runs directly on NodeMCU.
Note: This requires ESP8266 support package:
https://github.com/esp8266/Arduino
Please be sure to select the right NodeMCU module
in the Tools -> Board menu!
For advanced settings please follow ESP examples :
– ESP8266_Standalone_Manual_IP.ino
– ESP8266_Standalone_SmartConfig.ino
– ESP8266_Standalone_SSL.ino
Change WiFi ssid, pass, and Blynk auth token to run 🙂
Feel free to apply it to any other example. It’s simple!
*************************************************************/
/* Comment this out to disable prints and save space */
#define BLYNK_PRINT Serial
/* Fill-in your Template ID (only if using Blynk.Cloud) */
//#define BLYNK_TEMPLATE_ID “YourTemplateID”
#include <ESP8266WiFi.h>
#include <BlynkSimpleEsp8266.h>
// You should get Auth Token in the Blynk App.
// Go to the Project Settings (nut icon).
char auth[] = “YourAuthToken”;
// Your WiFi credentials.
// Set password to “” for open networks.
char ssid[] = “YourNetworkName”;
char pass[] = “YourPassword”;
void setup()
{
// Debug console
Serial.begin(9600);
Blynk.begin(auth, ssid, pass);
// You can also specify server:
//Blynk.begin(auth, ssid, pass, “blynk-cloud.com”, 80);
//Blynk.begin(auth, ssid, pass, IPAddress(192,168,1,100), 8080);
}
void loop()
{
Blynk.run();
}